Updated: How to Install the Resynthesizer Plugin for GIMP on Mac (2022)
There is an easier way to get the resynthesizer plugin working. Here's how!
After this article was published, GIMP released (Dec. 2, 2022) separate builds for ARM Macs and Intel Macs. This article may still work with the Intel build of GIMP 2.10.32 revision 1 and later, but it will not work with ARM Macs. For ARM Macs, please see my updated article: How to Install the Resynthesizer Plugin for GIMP on Macs with Apple Silicon (2024).
Not sure which processor you have? Follow this support page.
Intro
Ok folks, welcome back! This is a long overdue update to the Resynthesizer Plugin installation tutorial for Mac that I posted about a year and a half ago. I apologize for everyone that jumped through all those hoops to install the plugin. At the time, that was the only way I knew how to make it work. It did work for many, but for some, they got lost along the way and didn’t have the same success.
This updated method is much, much easier to complete and only requires two commands on the terminal to complete. It should take only a few minutes if you already have GIMP installed. No additional installations of brew or any other software is necessary. 😅
I have verified that this updated fix works with:
- Intel Mac Catalina (10.15.7)
- M1 Mac Big Sur (11.6.8)
- Intel Mac Big Sur (11.7)
- M1 Mac Monterey (12.6)
Before we get started, I want to give a shoutout to Philip Brown. He sent me an email after he read my previous blog post on how to install the resynthesizer plugin. He’s the one that introduced me to this easier method and I’d like to thank him for that. It’s great to see the community help each other out like this and it’s just something you love to see.
TL;DR
- Download and install GIMP
2.10.32 revision 0- ⚠️ Note that the latest version of GIMP:
2.10.32 revision 1, which creates separate builds for ARM Macs and Intel Macs, will not work with the following instructions ⚠️ - You can check what version of GIMP you have by opening GIMP, going to GIMP in the menu bar –> About GIMP. If it says
2.10.32, then the rest of this article will work. If it says2.10.32 (revision 1), the rest of this article will not work.
- ⚠️ Note that the latest version of GIMP:
- Download the resynthesizer plugin for Mac: ResynthesizerPlugin-Gimp-2.10-osx.tgz
- Extract the
.tgzplugin and copy the contents in theResynthesizerPlugin-Gimp-2.10-osxfolder to/Applications/GIMP-2.10.app/Contents/Resources/lib/gimp/2.0/plug-ins - Try to run the resynthesizer plugin on an image (Filters –> Enhance –> “Heal selection…”) in GIMP.
- If it works, you’re good to go! If not, continue
- Change directories to GIMP’s library folder
cd /Applications/GIMP-2.10.app/Contents/Resources/lib
- Check if you have
libintlinstalled:ls -lah libintl*- If you have
libintl.8.dylibinstalled, continue - If you have
libintl.9.dylibinstalled and resynthesizer is not working… comment below and I’ll try to help you! - If you have neither or something entirely different, comment below and I’ll try to help you!
- If you have
- Create a symbolic link to “fake” that you have
libintl.9.dylibinstalled:ln -s libintl.8.dylib libintl.9.dylib
- Restart GIMP, Heal selection… should now work! 🤞
Download and Install GIMP
For starters, we need to download and install GIMP. You need to download GIMP 2.10.32 revision 0 from here.
Note that if you download the latest version of GIMP (
2.10.32 revision 1) from here, this tutorial will not work to enable the resynthesizer plugin. In order for this article to work, you will need to remove GIMP2.10.32 revision 1(and/or other GIMP versions) by dragging the GIMP app from/Applicationsto the trash, and install GIMP2.10.32 revision 0from the link above.
The version that I used for this tutorial is 2.10.32 (revision 0). If you’re on Mac, you can open (mount) that downloaded file then click and drag GIMP to the Applications folder. If you’re on another OS, follow the instructions GIMP gives you :)
Download and Install the Resynthesizer Plugin
We can download the resynthesizer plugin from aferrero2707’s repo on GitHub: gimp-plugin-collections. If you navigate to the releases and then to continuous build, you can scroll down and see all the plugins available. We want to download ResynthesizerPlugin-Gimp-2.10-osx.tgz . Once downloaded, you can extract it and open up the resulting folder to see a bunch of Python files. We need to copy them to GIMP’s plugin folder. To find GIMP’s plugin folder, you can open GIMP, then go to GIMP-2.10 (in the menu bar) –> Preferences –> scroll down on the left column to Folders, click on Folders to expand it –> Plug-ins. You will likely see two different options for placing these plugin files:
1
2
/Users/<username>/Library/Application Support/GIMP/2.10/plug-ins
/Applications/GIMP-2.10.app/Contents/Resources/lib/gimp/2.0/plug-ins
You can copy to either one, but /Applications is easier (you need to create the folder for /Users). You can click on the /Applications/... path in the window to select it, then you can open that path by clicking on the office cabinet-looking icon on the top right which will show the tooltip “Show file location in the file manager”. Once that is open, we can select and drag all of the python files over to that window, quit GIMP (Command (⌘) + Q or GIMP-2.10 –> Quit GIMP-2.10), re-open GIMP, and the resynthesizer plugin should appear as an option under Filters –> Enhance –> “Heal selection…”!
Testing the Resynthesizer Plugin (Heal selection)
Now that we have installed the resynthesizer plugin, we can give it a quick test to see if it will work (likely not). Let’s start by importing an image into GIMP (click and drag an image into GIMP, then [if necessary] click convert to change the color profile to what GIMP prefers). Next, we can select an area that contains an object we want to remove (by selecting the “Free Select” tool [press “f”] and clicking around the outside of our object or by selecting the “Rectangle Select” tool [press “r”] and making a rectangle around our object (less precise)). Finally, we can try to run the resynthesizer plugin: Filters –> Enhance –> “Heal selection…” –> OK. If it works, you’re good to go! Unfortunately for me, I was presented with the following errors:
1
2
Calling error for procedure 'gimp-procedural-db-proc-info':
Procedure 'plug-in-resynthesizer' not found
1
2
An error occurred running python_fu_heal_selection
error: procedure not found
1
2
3
4
5
6
7
8
Traceback (most recent call last):
  File "/Applications/GIMP-2.10.app/Contents/Resources/lib/gimp/2.0/python/gimpfu.py", line 741, in response
    dialog.res = run_script(params)
  File "/Applications/GIMP-2.10.app/Contents/Resources/lib/gimp/2.0/python/gimpfu.py", line 362, in run_script
    return apply(function, params)
  File "/Applications/GIMP-2.10.app/Contents/Resources/lib/gimp/2.0/plug-ins/plugin-heal-selection.py", line 148, in heal_selection
    pdb.plug_in_resynthesizer(timg, tdrawable, 0,0, useBorder, work_drawable.ID, -1, -1, 0.0, 0.117, 16, 500)
error: procedure not found
Fixing the Resynthesizer Plugin via a Symbolic Link
In computer terms, the plugin is looking to use a library that we do not have: libintl.9.dylib. I don’t know how to get that exact version of the library, but, it turns out that libintl.8.dylib comes pre-installed with GIMP, so we can (luckily) tell the plugin to use that version and carry on our merry way.
The next part of this tutorial uses the terminal to create and modify some files. If you are unfamiliar with the terminal or would like to learn more, check out my post here for an “Introduction to the Terminal / Shell / Command Line, etc.”.
Checking for libintl
To check if you already have libintl.8.dylib installed, open Terminal, go to the /Applications/GIMP-2.10.app/Contents/Resources/lib directory via cd /Applications/GIMP-2.10.app/Contents/Resources/lib, and try to list all files named “libintl” via ls -lah libintl*.
If it outputs libintl.8.dylib, then continue on to the next step.
If it outputs libintl.9.dylib and the resynthesizer plugin doesn’t work, then I’m not really sure how to help you. Leave a comment below to explain what’s happening and I’ll try to help!
1
2
3
4
username@Mac:~$ cd /Applications/GIMP-2.10.app/Contents/Resources/lib

username@Mac:/Applications/GIMP-2.10.app/Contents/Resources/lib$ ls -lah libintl*
-rwxr-xr-x@ 1 username admin   81K Jan 28  2021 libintl.8.dylib
Creating a symbolic link to “fake” having libintl.9.dylib
The resynthesizer plugin is looking for libintl.9.dylib. We can “cheat” and tell it to use libintl.8.dylib via ln -s libintl.8.dylib libintl.9.dylib:
1
2
3
4
5
6
7
8
9
10
username@Mac:~$ cd /Applications/GIMP-2.10.app/Contents/Resources/lib

username@Mac:[...]/GIMP-2.10.app/Contents/Resources/lib$ ls -lah libintl*
-rwxr-xr-x@ 1 username admin   81K Jan 28  2021 libintl.8.dylib

username@Mac:[...]/GIMP-2.10.app/Contents/Resources/lib$ ln -s libintl.8.dylib libintl.9.dylib

username@Mac:[...]/GIMP-2.10.app/Contents/Resources/lib$ ls -lah libintl*
-rwxr-xr-x@ 1 username admin   81K Jan 28  2021 libintl.8.dylib
lrwxr-xr-x  1 username admin   15B Sep 16 22:34 libintl.9.dylib -> libintl.8.dylib
Using the Resynthesizer Plugin
That’s it! You should now be able to restart GIMP (quit and open it back up), and once you select an object (details here), then go through the same steps to use the resynthesizer plugin (Filters –> Enhance –> “Heal selection…” –> OK), it should now synthesize successfully! 🤞
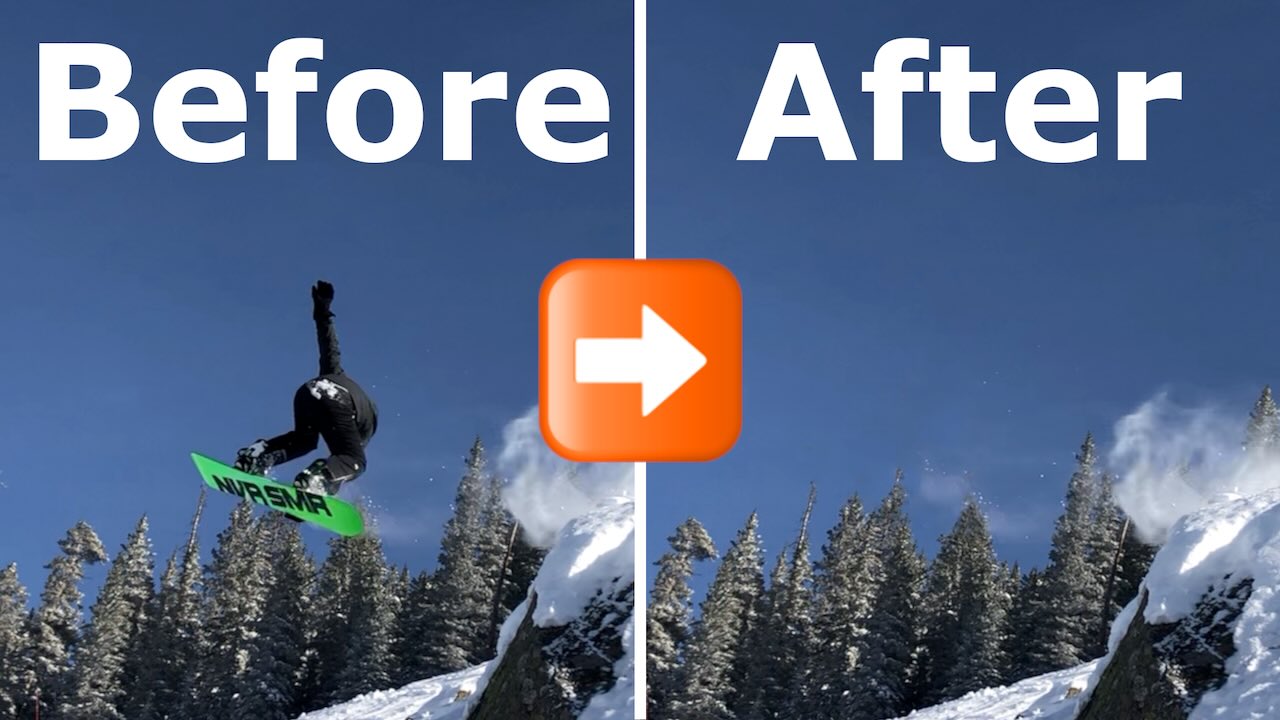 Example of a successful use of the resynthesizer plugin!
Pretty nice for an automatic tool!
Bonus: Alternative to the Resynthesizer Plugin
If the above seemed like too much, we can get similar results to the resynthesizer tool manually by using the heal and clone tools that GIMP provides. I’m not going to do a full writeup about it here, but I did go into a quick example in my past YouTube video. I’m sure you could find some similar or even better tutorials on those tools online.
Outro
That’s it! Thanks again to Philip Brown for the tip.
If you have any questions or suggestions, feel free to comment in Disqus below.